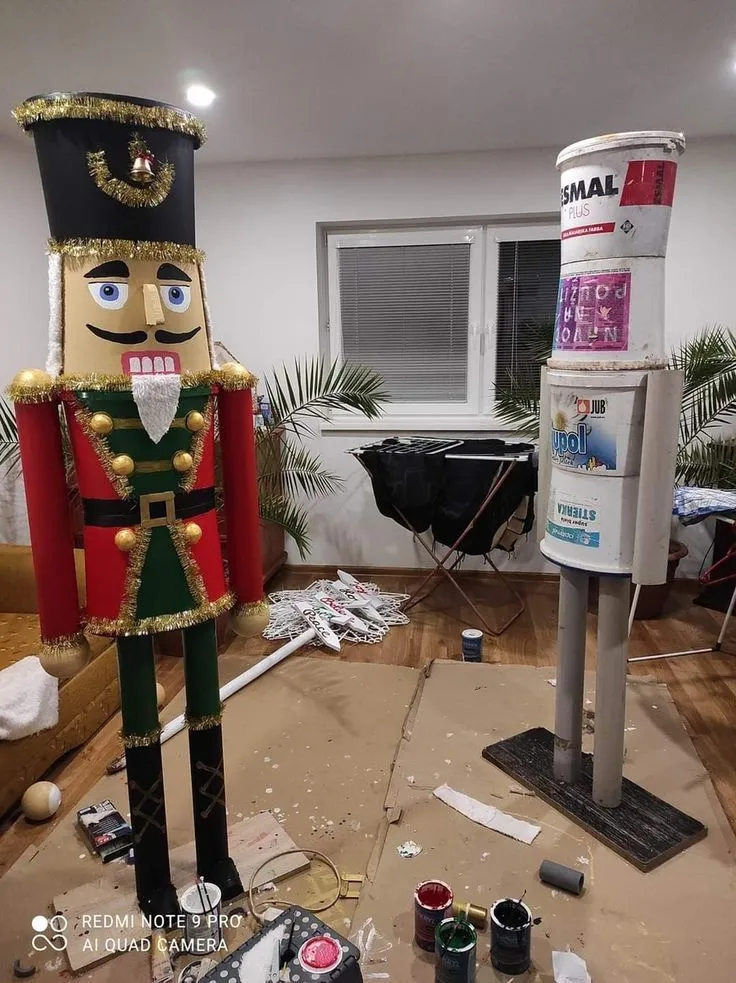
Looking to create a statement piece for your holiday decor? This DIY giant nutcracker is an impressive way to add festive charm to your home, all while staying eco-friendly. Using recycled materials like old buckets, cans, and some paint, you can craft this eye-catching decoration that’s perfect for any holiday display. Let’s dive into how you can make your own giant nutcracker with materials you likely have around the house!

Materials Needed
One of the best parts of this project is that it makes use of recycled items, keeping your crafting budget low and your environmental impact light. Here’s what you’ll need to get started:
- Large Plastic Buckets or Paint Cans: These will form the main body of the nutcracker.
- PVC Pipes or Cardboard Tubes: Great for the legs or arms, adding sturdiness and height.
- Craft Paints in Various Colors: Opt for classic nutcracker colors like red, green, black, and gold.
- Hot Glue Gun and Glue Sticks: Essential for assembling different parts securely.
- Glitter and Decorative Ribbons: To add that festive touch.
- Gold Trim or Tinsel: For the hat, shoulders, and other decorative elements.
Feel free to get creative and add more items to personalize your nutcracker!
Step-by-Step Guide
1. Start with the Body
Begin by stacking your plastic buckets or paint cans to create the nutcracker’s torso. Use strong adhesive to secure them. You may want to add some weight to the base to keep it stable, especially if your nutcracker will be displayed outdoors.
2. Create the Head
For the head, a round object like a foam ball or a small bucket can work well. Paint it with a face, and add details such as eyes, eyebrows, and a mustache. Use cardboard or foam for the nose, and paint on a big smile to give your nutcracker character!
3. Add the Hat
A plastic container or another paint can works well for the hat. Paint it black and add a gold trim or tinsel around the edges for a regal look. You can also glue on a small bell or emblem for extra detail.
4. Construct the Arms and Legs
PVC pipes or cardboard tubes are great for creating the nutcracker’s arms and legs. Paint them to match the body and attach them securely. Consider adding shoulder decorations, like pom-poms or gold tinsel, for added flair.
5. Paint and Add Details
This is where your creativity shines. Use different colors to create the classic nutcracker suit. Add buttons, belts, and other small touches to make your nutcracker unique. A combination of metallic and matte paints works well to give it that polished yet handcrafted look.
6. Assemble and Display
Once everything is painted and dried, assemble all the parts and make sure everything is secure. Position your nutcracker in your desired location, whether by the front door, by the fireplace, or as part of your holiday centerpiece.
Tips for Success
- Use Weather-Resistant Paint if you plan to display your nutcracker outdoors.
- Add Lights for an extra festive touch, especially if you’re setting it up outside.
- Personalize the Colors to match your home decor or holiday theme.
Why Make a DIY Nutcracker with Recycled Materials?
Using recycled materials for your DIY projects has multiple benefits:
- Eco-Friendly: Reduces waste and encourages sustainable crafting.
- Budget-Friendly: Saves money by using items you already have around the house.
- Unique Decor: Your handmade nutcracker is one-of-a-kind and can’t be found in stores.
Final Thoughts
This DIY giant nutcracker project is a fantastic way to embrace the holiday spirit while being kind to the environment. Crafting with recycled materials not only reduces waste but also adds a personal touch to your holiday decorations. Display your nutcracker proudly and watch as it becomes the highlight of your festive decor!
So, if you’re ready to take on this fun, festive DIY, grab your supplies and let the crafting begin! Happy holidays and happy crafting!


