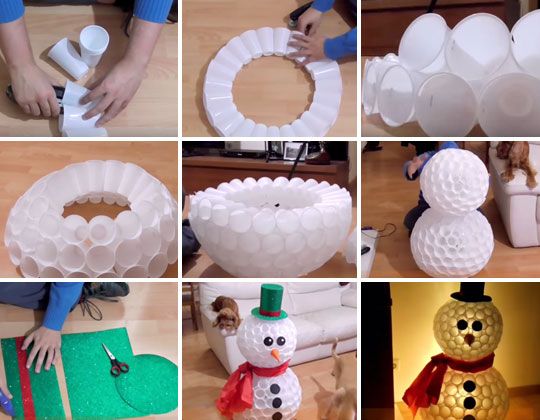
Creating a snowman out of plastic cups is a fun and creative craft, perfect for holiday decorations or winter projects. The materials are easy to find, and the process is enjoyable for both kids and adults. Here’s how to make a cute snowman using plastic cups:
Materials You’ll Need:
- White plastic cups (approximately 100-150)
- Hot glue gun or a stapler
- Scissors
- Green and red felt paper (or foam sheets)
- Colored buttons (black, or any dark color)
- Small hat (you can make one from felt or use a ready-made one)
- Black marker
- Red ribbon or scarf
- Lights (optional, for illumination)
Step-by-Step Instructions:
- Creating the Bottom Ball:
- Start by laying the plastic cups in a circular arrangement on a flat surface. Use hot glue or staples to attach them to each other at the rims. This will be the base of your snowman.
- Continue building layers by adding more cups, slightly overlapping them as you go. Make sure each cup is attached to the ones around it, slowly building upwards into a dome shape.
- Once the half-sphere is completed, flip it over. This will form the lower part of the snowman’s body.
- Creating the Upper Ball:
- Repeat the same process with a smaller number of cups to create a smaller dome, which will serve as the snowman’s head.
- Attach this smaller dome securely to the top of the larger one using glue or staples. This will complete the snowman’s body shape.
- Adding Facial Features:
- Cut two circles out of black felt or foam to make the eyes. You can use buttons instead for a more textured look.
- Create a carrot-like nose by rolling orange paper or felt into a cone shape.
- Use the black marker to draw the snowman’s mouth with small dots in a smile pattern.
- Making the Hat and Scarf:
- To give your snowman a festive touch, cut a green felt or foam sheet into the shape of a hat and glue it onto the top of the snowman’s head.
- Cut a long strip of red felt or fabric to form the snowman’s scarf, and wrap it around the neck (where the two domes meet).
- Decorating the Body:
- Attach black buttons down the middle of the snowman’s body, like traditional snowman buttons.
- You can also add additional accessories, such as a small broom or mittens for extra charm.
- Optional: Adding Lights
- If you want your snowman to light up, carefully place a string of fairy lights inside the cups before attaching the domes. This will make the snowman glow beautifully when lit up in a dark room.
Final Touches: Now that your plastic cup snowman is complete, you can place it in your home as part of your holiday decorations. If using lights, be sure to plug them in for a cozy, glowing snowman that can light up any space!
This fun and eco-friendly craft is a great way to reuse materials while bringing a little holiday cheer to your home!

